Shopifyアプリを自作してみたいと思い、まずはShopify CLIをインストールしてみようとしましたが、いきなりエラー。。。
Step1 このコマンド叩く
brew tap shopify/shopify
するといきなり、こんなメッセージが、、、
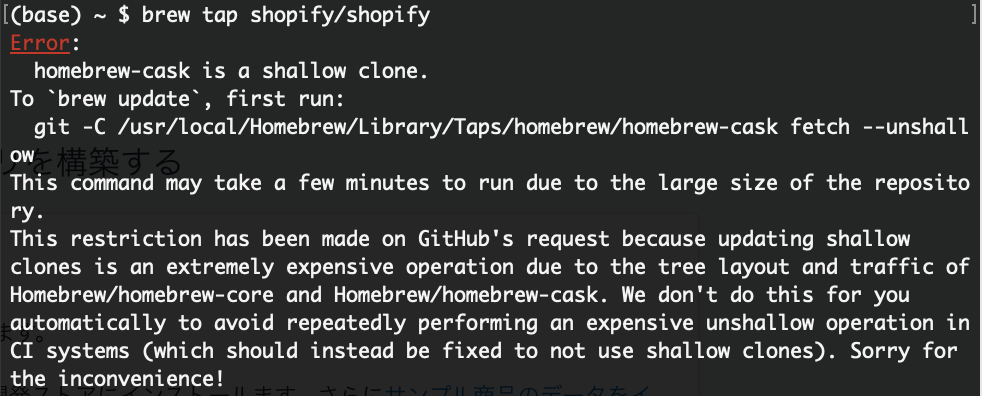
git -C /usr/local/Homebrew/Library/Taps/homebrew/homebrew-cask fetch –unshallow
これを入れる必要があるみたいです。
This command may take a few minutes to run due to the large size of the repository.
This restriction has been made on GitHub’s request because updating shallow
clones is an extremely expensive operation due to the tree layout and traffic of
Homebrew/homebrew-core and Homebrew/homebrew-cask. We don’t do this for you
automatically to avoid repeatedly performing an expensive unshallow operation in
CI systems (which should instead be fixed to not use shallow clones). Sorry for
the inconvenience!
どうやら、GitHubへのリクエストに対しての警告みたい。指示通り、『git〜』のコマンド入れて、再度Shpifyのコマンドを叩いてみたら上手く行きました。
Step2 次にこのコマンド入れる
brew install shopify-cli
ここは問題ないみたい。
気持ちいいくらい。
と、油断していたらこんなエラーが出てきた
Error: The
brew linkstep did not complete successfullyThe formula built, but is not symlinked into /usr/local
Could not symlink sbin/unbound
/usr/local/sbin is not writable.
You can try again using:
brew link unbound
Shopifyのトラブルシューティングに記載のアップデートコマンドを叩いてみたらすでに入ってますよと言われたので多分大丈夫。
Step3 プロジェクトを作る
ユーザー>Shopifyフォルダを作成して新しいディレクトリ作成しました。
次にチュートリアルの手順通りコマンド叩く
$ shopify create
すると、いろいろ聞かれます。
What type of project would you like to create?
→Node.jsかRubyどっちにするか選択。私はNode.jsを選択。
App name
→アプリの名前。
何にしようかな。。。
What type of app are you building?
→カスタムか公開か聞かれます。
いつも公開なのでカスタムにしてみました。
するとこのURLをブラウザで開いてと言われるので指示通りブラウザでOPEN。
Authenticated successfully. You may now close this page.
の文字が表示されました!なんだか嬉しい♪
ブラウザ上のShopify Partnerの管理画面の設定と全く同じ手順でコマンドで行っています。めっちゃ便利ですね!!!
その後は指示通り進めて、、、
無事アプリ作成完了!管理画面上のアプリ管理に表示されてます!!!
Step4 shopify serve 実行
またもやここで少しつまづく。。。
shopify serve
を実行してとのことなので、コマンド叩いてみた。not foundが出てきた。
もう一度、叩く。結果は同じ。
それもそうだ!
Change directories to your new project folder アプリ名 and run shopify serve to start a local server
作成したアプリのディレクトリで実行してと指示があるではないか!?
ディレクトリを作成したアプリに移動しshopify serveを実行。
上手く行きました♪
コマンド上にngrokインストールしてサインアップした方が良いと出てたので、https://ngrok.com/signupでサインアップし、ngrokインストール。
これで簡単にShopifyアプリを立ち上げることができました♪
すごく便利。
次回は実際にアプリを作成してみます。
【Web開発初心者向け!】Web開発入門完全攻略 充実の18時間コース
![]()
未経験からプロのWebデザイナーになる! 400レッスン以上の完全マスターコース
![]()